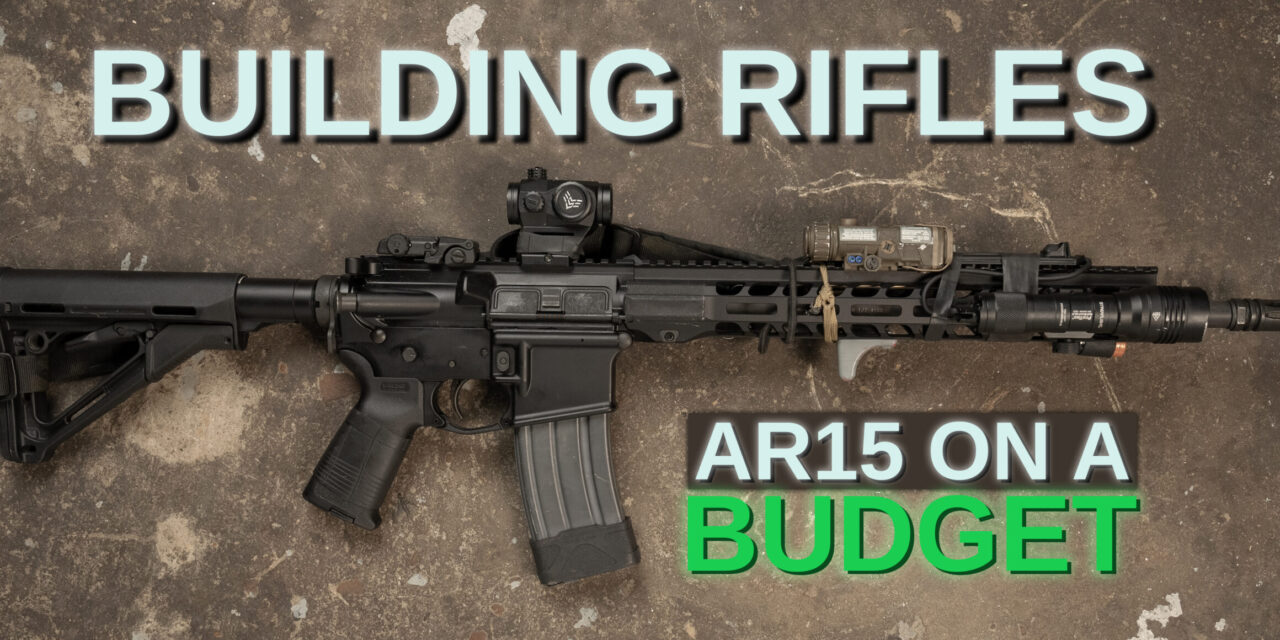
A “budget” AR15 is very subjective. Let me share an example of why you’re inevitably going to want to build one.
Rifles are cool, but eventually you need something else to entertain yourself with. So, after watching your favorite YouTubers, you decide to save up and finally buy yourself a set of night vision. It doesn’t matter why, or what you tell your spouse to justify it, night vision is just plain cool. But now you want to shoot your AR15 at night too. One problem though, you’ve just spent all your money on the night vision.
Let’s talk about how you can build an AR15, without costing you an arm and a leg.
Check out the video below to see how the rifle held up to our tests on the range:
Building A Budget AR-15
The rifle I chose for this budget build was the 16″ STAG-15 from Stag Arms. It comes with quality furniture from Magpul Industries and a ballistic advantage barrel. It’s a fairly solid option for a $1,000-$1,500 range complete base rifle.

The STAG-15 is a great budget AR15 to try out.
Accessories on a Budget
I decided not to change any of the internals and as stated previously stated, the rifle came with good furniture, so there was no need to spend extra money on changing the hand guard, stock, or pistol grip. I decided to put that money into the night vision accessories.
Budget Red Dot for Night Vision
After debating how much money I wanted to spend on this project, I think I am more curious about if certain products can hold up under night vision shooting or not. Because of this, I’m going with the Swampfox Liberator II for the optic. I opted not to purchase a tall mount for it though. I want to see if it is truly something that can be trained around, or if a high rise optic is necessary for shooting with night vision.

Swampfox Liberator II red dot is a cost efficient option for your rifle build.
Top Weapon Mounted Light Option for AR15
When choosing a weapon mounted light, prices can skyrocket. On the higher end of the market, you will find that companies often do not sell complete kits. You might have to purchase a light body, light head, assorted cables and other components. Each of these incur large costs. Sometimes it’s worth it and ensures that you are getting exactly what you want. Other times, it’s just a lot of money down the drain.

A weapon mounted light is highly useful and does not need to cost hundreds of dollars.
On this build I selected the Streamlight Protac RM HL-X. This is one of the absolute best bangs for your buck when it comes to a light you can put on a rifle for under $150. It comes with multiple ways to attach it (depending on what hand guard you may have), as well as a very decent pressure pad with both momentary and constant ignitions for the light.
I would always recommend this light if you are trying to save some money but still want to throw a light on your rifle, or if you just want to keep some back-ups handy.
IR Laser and Illuminator for Low Cost
Having an IR laser capability is going to be very important. While it is not the ONLY way to aim under night vision, it is most definitely the easiest. Unfortunately however, it does not come in a cheap option.
")
IR devices make shooting under night vision much easier.
But! There are options now, that are far less expensive that in former years. It’s important to me to try and keep an eye out on the market for new and innovative solutions for active aiming lasers. I think I have found a pretty interesting option that after playing with for a few months, I think will work okay for training or light use.
Reproduction Training Lasers?
Introducing the SomoGear NGAL. This is an airsoft reproduction model of the real life NGAL (Next Generation Aiming Laser) from L3. This reproduction laser has been making quite a stir in the community because it boasts very similar performance to the real life counter part at a whopping 12% of the cost. Now, of course we cannot recommend using this on your real firearms as this would void all warranties and it is clearly not designed to hold up to this type of use.

Do you think using the SomoGear laser can help you train?
The ideal use case for this laser would be to put it on a training rifle to dry-fire, or as the manufacture intended, airsoft guns for force-on-force training. But we wanted to see for ourselves just how far this little laser could be pushed.
Not only did the laser work, but in many ways the performance was better than a legitimate L3 Peq-15. Of course, it needs to be said that even now, I would never rely on the SomoGear NGAL over an actual L3 laser. Nor would I expect it to last under the same type of hard use. But it was impressive just how powerful the illuminator and laser were, as well as how true the build felt and good the buttons worked. I never had any flickering or shorting out. (yet)
I would love to put the laser through some tougher tests, but after 500 rounds of 5.56×45, I can happily report that it has held its initial zero and still functions as advertised.
To Suppress, or Not to Suppress?
Of course, many will wonder why I decided not to put a suppressor on this rifle. There’s a few reasons why I decided to omit a suppressor from the build, and some of them I regret now. Let me explain.
Originally, when laying out this build on paper, I wanted to do a few things:
- Save as much money as possible in order to keep the grand total to a reasonable price.
- Find out if you really needed all of the fancy equipment you see on the internet in order to shoot well under night vision.
- Be silly, be goofy, try to build something fun.
Pros & Cons of Shooting Unsuppressed
Because of reason #1, I thought that the suppressor would be a huge cost that ultimately would not effect the overall performance of the rifle. Although the performance side held true, it was only true when shooting alone. Not having a suppressor did not effect my ability to see my red dot while shooting. Even with muzzle flash, which was a good thing to learn, but there were some negatives.

“Not having a suppressor did not effect my ability to see my red dot while shooting.”
Shooting with people in a team, or in dynamic shooting drills, made communicating very difficult. If everyone was shooting suppressed, we could talk in just about a regular tone of voice. But once I started blasting, we all had to go back to shouting and looking at one another while we were talking in order to make sure everyone was on the same page.
During the hog hunt, shooting unsuppressed would scare off hogs that were not far off. In essence, taking opportunities to hunt more hogs away from our group.
At some point during this project I reached out to a friend of mine over at Witt Machine & Tool Co. to figure out what suppressor I could have used for not that much of a hit to my funds. I think next time I build out a budget rifle I want to throw on a Mod-1 chambered for .223. This would be well worth the cost for the ability to hunt more groups of hogs, as well as communicate easier with a team while shooting.
Ammunition Used
During the entirety of the project I used multiple brands of 5.56×45 ammo. But the shot groupings I did at the start of the project was with PMC X-Tac 55 Gr. FMJ-BT and Black Hills 75 Gr. Match HP.
Accuracy Testing
A distance of 50 yards was used for the zeroing and grouping process. I did 5-shot groups, from a bench rest using the visible laser of the NGAL.
PMC X-Tac 55 Gr. average group size: 1.2″ (w/ a flyer that brought it to a 2.1″ group)
Black Hills 75 Gr. Match average group size: 1″ (w/ a flyer bringing it to a 1.8″ group)
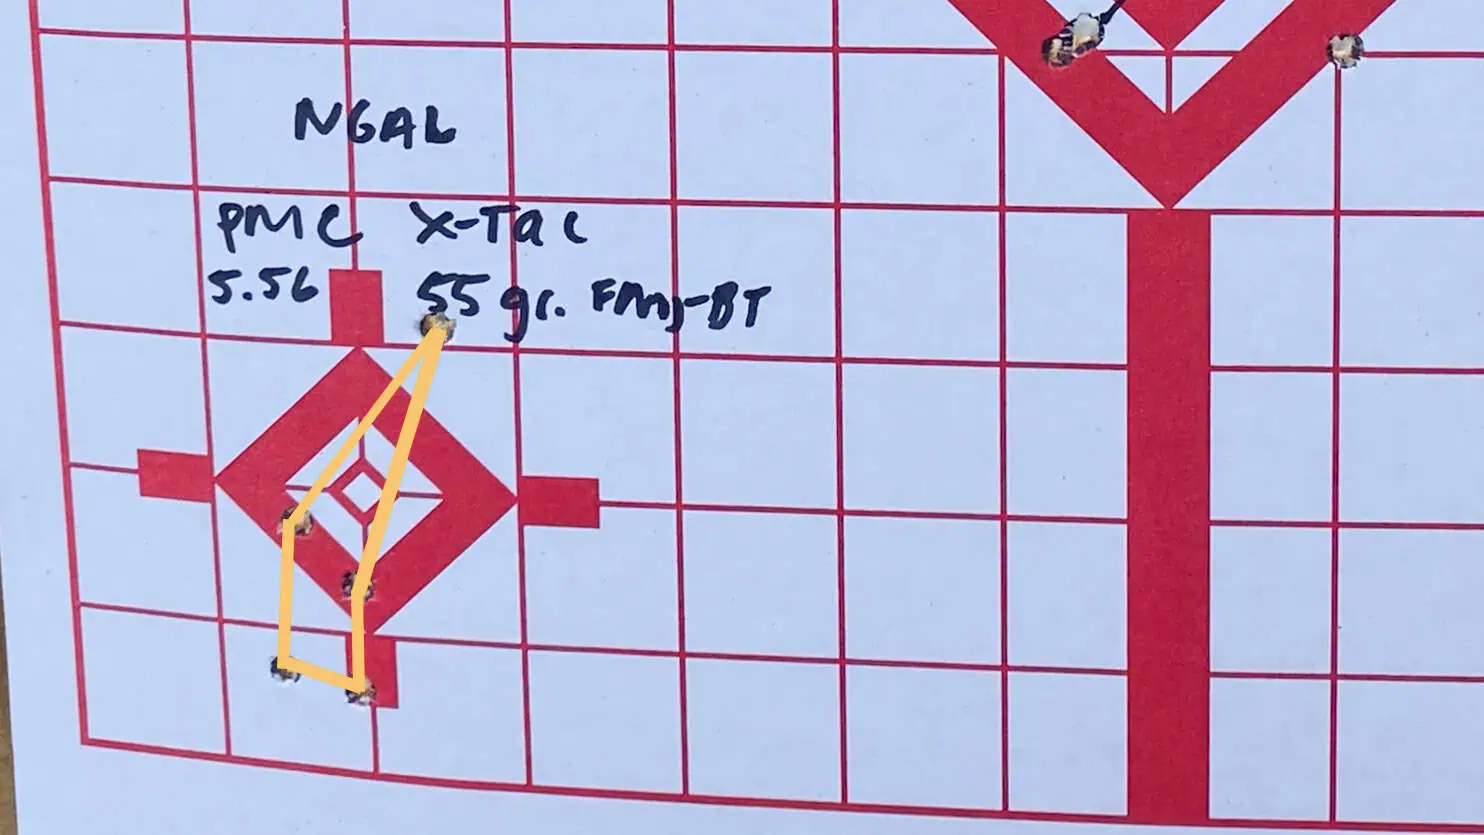
5-shot group with PMC 55 Gr. 5.56×45 ammo from STAG-15 and SomoGear NGAL.
Reliability Testing
I did not have any issues with cycling during this project, aside from halfway through the range testing after the hog hunt in Texas. I experienced a lot of failures to load that required remedial actions to clear and get chambered again.
A quick clean and re-lubrication brought the rifle back to running with no issues.
Cost Breakdown
All in all, this entire setup cost a hair over $2,200. Now, I think most people who are wanting to set up a rifle for night vision use probably already have a rifle, or two for that matter. If that’s the case then the accessories only cost $835!
| Budget Build | Price | Anti Budget Build | Price | |
|---|---|---|---|---|
| 16" Stag Arms | $1,400.00 | BCM 14.5 | $1,500.00 | |
| Somo NGAL | $449.00 | FP Peq | $2,400.00 | |
| Swampfox red dot | $149.00 | Hxwrx HX-QD 7.62 TI | $1,522.00 | |
| Streamlight Protac HLX | $128.00 | Scout vampire | $479.00 | |
| MBUS 2 Rear sight | $59.95 | Holosun 403c | $211.75 | |
| ESD Sling | $49.99 | Unity 1.93 mount | $205.00 | |
| Bird Cage Brake | $0.00 | Huxwrx Brake | $177.00 | |
| Mil-spec charging handle | $0.00 | Surefire tail cap | $135.00 | |
| Lower third mount | $0.00 | Unity Axon Switch | $119.00 | |
| 3D printed handstop | $0.00 | Radian charging handle | $94.95 | |
| Spartan Precision Davros Tripod Head | $75.00 | |||
| Total | $2,235.94 | Ferro Sling | $58.97 | |
| Accessories | $835.94 | Tripod rail mount | $33.85 | |
| SAVINGS | $4,750.58 | BCM Foregrip | $25.00 | |
| Pic to MLOK adapter | $25.00 | |||
| Total | $7,061.52 | |||
| Suppressor/Light Accessories | $4,832.00 | |||
I know that’s not an insignificant amount of money, but when you realize that you could spend almost the same amount on a flashlight and its switches alone, it’s not a close comparison. Getting into the night vision shooting game is expensive, but there are many ways to work around it at the beginning as you are learning what gear you may want or need.
Final Thoughts
I think using this build for training, or figuring out what you want to save your money for can save you a lot of heartache. As well as giving you many repetitions with a setup that will be very close to what you may end up building in the future, making you better prepared for when you finally buy that next piece of gear.
I think a good use for these accessories would be to build a clone of your most used rifle, and build it in .22 LR. Whether you decide to use a factory built base, or just a conversion bolt. I think either will provide you the chance to have fun, train more, and protect your investments from getting the brunt of your abuse on the range. If you want to learn more about what that looks like, check out this article on Rifles For Beginners.
Either way, I hope you’ve enjoyed seeing what I was able to do with the project and maybe it inspires you on your next rifle build!
Be sure to come back for more articles in the future as we dive into more rifle topics. If you want behind the scenes content on what we are up to, follow us on Instagram and Facebook. Thank you for your support, and we’ll see you soon!